25 Mayıs 2022 Çarşamba

Vitess Orchestrator - vtorc

Planetscale Operator vs Vitess Orchestrator
Planetscale Vitess Operator bir cluster'ı istenilen state/duruma getirir. Örneğin 3 tane tabletim olsun dersek operator 3 tane tabletin sürekli çalışmasını sağlar. Ancak tabletler halen komut satırından yönetmek gerekiyor. Örneğin reparenting işlemi yapmak veya tabletleri izlemek istiyorsak bunu komut satırından yapmak gerekiyor. 

Vitess Orchestrator tabletleri yönetme işini kolaylaştırıyor. Bize sağladığı kullanıcı arayüzüyle (GUI) hem tabletleri kolayca izleyebiliyoruz, hem de sürükle bırak ile tabletleri yönetebiliyoruz.

Vitess Orchestrator Nereden Geliyor
Açıklaması şöyle
vtorc is a fork of the Orchestrator customized to run as a Vitess component.

Orchestrator tarafından kullanılan sorgular orchestrator.conf.json dosyasında

GCP üzerinde şöyle yaptım. Bağlanacak port adresine "kubectl get svc" ile bakmak gerekiyor. Böylece "http://172.18.17.99:30055/" ile bağlandım
kubectl expose pod adv-vitess-cluster-adv-x-x-az1-vtorc-c0df5135-64b9dd7f97-k9jt2 
  --port=3000 
  --target-port=3000 
  --type=NodePort 
  --name vtorc 
Ayarlar
Bir örnek burada

Örnek
Şöyle yaparız. secret'ın ismi example-cluster-config. Bunun içindeki orc_config.json bölümünde ayarlar var
apiVersion: planetscale.com/v2
kind: VitessCluster
metadata:
  name: {{ $.Values.keyspaceName }}-vitess-cluster
spec:
  images:
    ...
  backup:
    ...
  globalLockserver:
    ...
  cells:
    ...
  vitessDashboard:
    ...
  keyspaces:
    ...
      vitessOrchestrator:
        configSecret:
          name: example-cluster-config
          key: orc_config.json
        resources:
          limits:
            memory: 128Mi
          requests:
            cpu: 100m
            memory: 128Mi
    ...
Ayrıca secret.yaml dosyasındaki Orchestrator kullanıcısını etkinleştirmek gerekiyor. Yani şöyle oluyor
stringData:
  ..
  init_db.sql: |
    ...
    # User for Orchestrator (https://github.com/openark/orchestrator).
    # TODO: Reenable when the password is randomly generated.
    CREATE USER 'orc_client_user'@'%' IDENTIFIED BY 'orc_client_user_password';
    GRANT SUPER, PROCESS, REPLICATION SLAVE, RELOAD
      ON *.* TO 'orc_client_user'@'%';
    GRANT SELECT
      ON _vt.* TO 'orc_client_user'@'%';

    FLUSH PRIVILEGES;

    RESET SLAVE ALL;
    RESET MASTER;
  orc_config.json: |
    {
      "Debug": true,
      "Durability": "none",
      "MySQLTopologyUser": "orc_client_user",
      "MySQLTopologyPassword": "orc_client_user_password",
      "MySQLReplicaUser": "vt_repl",
      "MySQLReplicaPassword": "",
      "RecoveryPeriodBlockSeconds": 5
    }
Giriş Ekranı
Expose için öyle yaparız
kubectl expose pod adv-vitess-cluster-adv-x-x-az1-vtorc-c0df5135-69cd844c44-kf6zq 
  --port=3000 
  --target-port=3000 
  --type=NodePort 
  --name vtorc 
  -n rlwy-07
Worker node'lardan birisnin IP adresine şöyle bağlanırız.
http://172.18.17.115:31919/
Giriş ekranı şöyle

Eğer hata varsa şöyle.


 Availability zone olan ADV'nin içi şöyle

Bir başka şekil şöyle. Buradaki siyah başlık ne anlama geliyor bilmiyorum

IP adresi yerine alias kullanılabilir.
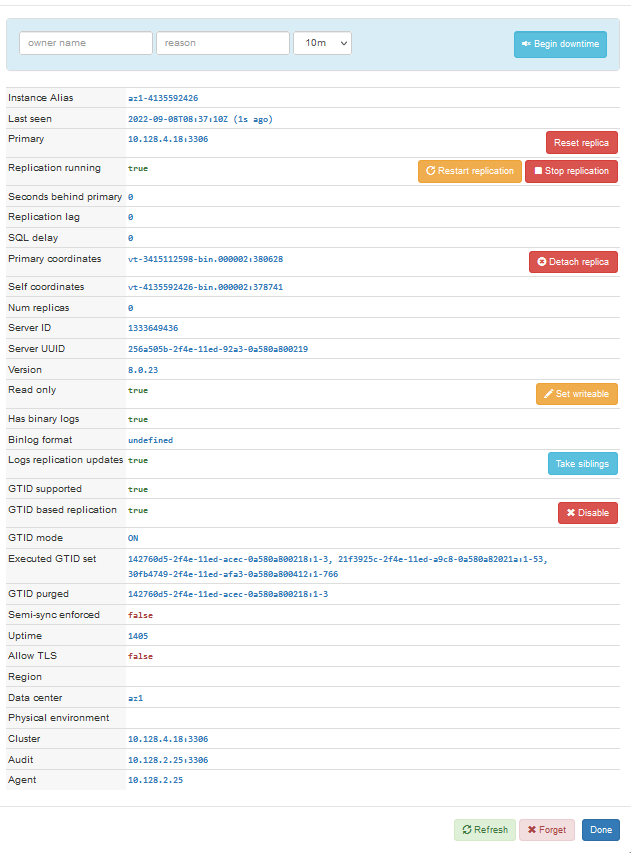
Primary şöyle
Burada Binlog format neden undefined bilmiyorum. Çünkü SQL ile kontrol edince çıktı şöyle. Yani ROW formatında Binlog olması lazım
> SELECT @@global.binlog_format;
ROW

> SHOW VARIABLES LIKE '%bin%';

Variable_name Value

bind_address *
binlog_cache_size 32768
binlog_checksum CRC32
binlog_direct_non_transactional_updates                         OFF
binlog_encryption OFF
binlog_error_action ABORT_SERVER
binlog_expire_logs_seconds         259200
binlog_format ROW
binlog_group_commit_sync_delay                 0
binlog_group_commit_sync_no_delay_count                         0
binlog_gtid_simple_recovery         ON
binlog_max_flush_queue_time         0
binlog_order_commits         ON
binlog_rotate_encryption_master_key_at_startup OFF
binlog_row_event_max_size         8192
binlog_row_image FULL
binlog_row_metadata MINIMAL
binlog_row_value_options
binlog_rows_query_log_events                 OFF
binlog_stmt_cache_size         32768
binlog_transaction_compression                 OFF
binlog_transaction_compression_level_zstd                         3
binlog_transaction_dependency_history_size                         25000
binlog_transaction_dependency_tracking                         COMMIT_ORDER
innodb_api_enable_binlog         OFF
log_bin                                                                 ON
log_bin_basename /vt/vtdataroot/vt_1330809953/bin-logs/vt-1330809953-bin
log_bin_index /vt/vtdataroot/vt_1330809953/bin-logs/vt-1330809953-bin.index
log_bin_trust_function_creators                 OFF
log_bin_use_v1_row_events         OFF
log_statements_unsafe_for_binlog                 ON
max_binlog_cache_size         18446744073709547520
max_binlog_size 1073741824
max_binlog_stmt_cache_size         18446744073709547520
sql_log_bin ON
sync_binlog 1
Zaten Vitess belgelerindeki açıklama da şöyle. Bu açıklamaları koyu renk ile işaretledim. Sanırım vtorc ekranları doğru göstermiyor.
When specifying additional configuration changes to Vitess, please keep in mind that changing the following settings is unsupported:
...

log-bin                 Several Vitess features rely on the binary log being enabled.
binlog-format Vitess only supports row-based replication. Do not change this setting from the included configuration files.
binlog-row-image Vitess only supports the default value (FULL)
GTID çıktıları da şöyle
> SHOW GLOBAL VARIABLES LIKE '%gtid%';
binlog_gtid_simple_recovery         ON enforce_gtid_consistency         ON gtid_executed                         f5bc78a8-2516-11ed-8db6-0a580a830019:1-13035 gtid_executed_compression_period 0 gtid_mode                         ON gtid_owned gtid_purged                         f5bc78a8-2516-11ed-8db6-0a580a830019:1-12589 session_track_gtids                 off > SHOW VARIABLES LIKE '%gtid_next%'; gtid_next                         AUTOMATIC
MASTER durumu şöyle. Burada Binlog_Do_DB | Binlog_Ignore_DB |sütunlarını sildim
> SHOW MASTER STATUS; 

File				Position Executed_Gtid_Set
vt-1330809953-bin.000015	1909	 f5bc78a8-2516-11ed-8db6-0a580a830019:1-13035
SHOW SLAVE STATUS boş satır döndürüyor

Replica şöyle
Readonly şöyle
Sonra şöyle yaptım
vc PlannedReparentShard --keyspace_shard ADV/- --new_primary az1-1330809953
Komut hata verdi ama ekran da replica primary oldu.


19 Mayıs 2022 Perşembe

PlanetScale Operator - VitessCluster.yaml

Giriş
Bölümler burada
images bölümünde kullanılacak image isimleri belirtiliyor
backup bölümünde eğer veri tabanı yedeklenecekse bu belirtiliyor
cells bölümünde kullanılan availability zone isimleri belirtiliyor. Bu ayarlar aslında vtgate için uygulanıyor
keyspaces bölümünde veri tabanı belirtiliyor. Her veri tabanı için hangi cell'de hangi tablet olacağını belirtiyoruz
globalLockserver
vitessDashboard sanırım topology server ayarlarını belirtiyor. İzleyeceği cell'leri belirtiyoruz

updateStrategy Alanı
Örnek
Şöyle yaparız
updateStrategy:
    type: Immediate
Açıklaması şöyle. Immediate ise VitessCluster.yaml dosyasındaki değişiklikleri Vitess Operator hemen uyguluyor
Type selects the overall update strategy.

Supported options are:

    External: Schedule updates on objects that should be updated, but wait for an external tool to release them by adding the ‘rollout.planetscale.com/released’ annotation.
    Immediate: Release updates to all cells, keyspaces, and shards as soon as the VitessCluster spec is changed. Perform rolling restart of one tablet Pod per shard at a time, with automatic planned reparents whenever possible to avoid master downtime.

Default: External
Eğer external ise tableti elle tekrar başlatmak için şöyle yaparız
kubectl annotate pod my-vttablet-zone1 "rollout.planetscale.com/released=true"
cells Alanı
"Availability zone" yani "cell" listesidir. Her cell için VtGate yaratılır.
Örnek
Şöyle yaparız
apiVersion: planetscale.com/v2
kind: VitessCluster
metadata:
  name: {{ $.Values.keyspaceName }}-vitess-cluster
spec:
  images:
    ...
  backup:
    ...
  globalLockserver:
    ...
  cells:
    - name: az1
      gateway:
        replicas: 2
        extraFlags:
          mysql_server_version: "8.0.23-Vitess"
          mysql_auth_server_impl: "none"
        resources:
          requests:
            cpu: 200m
            memory: 256Mi
          limits:
            memory: 256Mi
Tüm cell'lere yani VtGate havuzuna tek servis açmak için şöyle yaparız
apiVersion: v1
kind: Service
metadata:
  labels:
    planetscale.com/cluster: adv-vitess-cluster
    planetscale.com/component: vtgate
  name: adv-vtgate
spec:
  ipFamilies:
    - IPv4
  ipFamilyPolicy: SingleStack
  ports:
    - name: web
      port: 15000
      protocol: TCP
      targetPort: web
      nodePort: 32090
    - name: grpc
      port: 15999
      protocol: TCP
      targetPort: grpc
      nodePort: 32100
    - name: mysql
      port: 3306
      protocol: TCP
      targetPort: mysql
      nodePort: 32110
  selector:
    planetscale.com/cluster: adv-vitess-cluster
    planetscale.com/component: vtgate
  sessionAffinity: None
  type: NodePort
keyspace Alanı
Veri tabanının hangi cell içinde olduğunu da belirtir.
Örnek
Örneğin tamamı şöyle
apiVersion: planetscale.com/v2
kind: VitessCluster
metadata:
  name: example
spec:
  images:
    vtctld: vitess/lite:mysql80
    vtgate: vitess/lite:mysql80
    vttablet: vitess/lite:mysql80
    vtbackup: vitess/lite:mysql80
    mysqld:
      mysql80Compatible: vitess/lite:mysql80
    mysqldExporter: prom/mysqld-exporter:v0.11.0
  cells:
  - name: zone1
    gateway:
      authentication:
        static:
          secret:
            name: example-cluster-config
            key: users.json
      replicas: 1
      extraFlags:
        mysql_server_version: "8.0.13-Vitess"
      resources:
        requests:
          cpu: 100m
          memory: 256Mi
        limits:
          memory: 256Mi
  vitessDashboard:
    cells:
    - zone1
    extraFlags:
      security_policy: read-only
    replicas: 1
    resources:
      limits:
        memory: 128Mi
      requests:
        cpu: 100m
        memory: 128Mi

  keyspaces:
  - name: ADV
    turndownPolicy: Immediate
    partitionings:
    - equal:
        parts: 1
        shardTemplate:
          databaseInitScriptSecret:
            name: example-cluster-config
            key: init_db.sql
          replication:
            enforceSemiSync: false
          tabletPools:
          - cell: zone1
            type: replica
            replicas: 1
            vttablet:
              extraFlags:
                db_charset: utf8mb4
              resources:
                limits:
                  memory: 256Mi
                requests:
                  cpu: 100m
                  memory: 256Mi
            mysqld:
              resources:
                limits:
                  memory: 1024Mi
                requests:
                  cpu: 100m
                  memory: 512Mi
              configOverrides: |
                [mysqld]
                lower_case_table_names = 1
            dataVolumeClaimTemplate:
              accessModes: ["ReadWriteOnce"]
              resources:
                requests:
                  storage: 1Gi
Örnek - keyspaces/replication/initializeBackup alanı 
Açıklama şöyle
Vitess Replication Spec has a field called initializeBackup which defaults to true. Setting that to false will prevent initial backups from happening
Açıklama şöyle
if backups already exist, the operator should not create a vtbackup-init pod... that said, you can force it not to create it with shardTemplate.replication.initializeBackup = false
Açıklama şöyle. Yani vtbackup-init eğer hiç backup yoksa bir backup yaratır
Q: I'm adding backup storage to an existing keyspace but the vtbackup-init is failing with
"Can't take backup: refusing to upload initial backup of empty database: the shard live/-80 already has at least one tablet that may be serving (zone1-1672169672); you must take a backup from a live tablet instead"
1. should I have initializeBackup  as false ?
2. I have to run vtctlclient -server localhost:15999 Backup zone1-3423003548 ?

A : number 2 should be enough to let you bootstrap from a backups-not-configured state to a backups-configured state, assuming the tablets have been restarted with the new backup settings (which should happen automatically if updateStrategy.type = Immediate. (edited) 

Q : If the mysql instances have no data will the vttablet restart with success? it seems that if the backup is enabled for an empty instance it doesn't skip the initial backup and the vttablet never be ready

A : if mysql is empty and backups are enabled, vttablet will look for a backup to restore upon startup. after you've run vtctlclient Backup once on that shard, this restore should work fine.

A : the operator uses vtbackup-init once per shard (not per tablet startup) to seed an empty backup if no backups exist yet, but this would be incorrect if any data has already been loaded into tablets. that's why vtbackup-init checks for this possibility and refuses to clobber data.
Yani bu alan true ise vtbackup-init isimli bir pod yaratılır ve işi bitince söndürülür. Pod çıktısı şöyle
$ kubectl get pods -n rlwy-08
NAME                                                             READY   STATUS        RESTARTS        AGE
adv-vitess-cluster-38e97f2b-vitessbackupstorage-subcontroller    0/1     Terminating   0               34s
adv-vitess-cluster-adv-x-x-vtbackup-init-61d77b76                0/1     Completed     1               4h

Örnek - keyspaces/mysqld
Bir örnekte şöyle yaptım. Yani ismi "standard" olan local Volume kullandım
mysqld:
    storageSize: 1Gi
    #hostpath for docker k8s
    #Creates a Persistent Volume Claim
    storageClassName: standard
    resources:
      limits:
        memory: 1256Mi
      requests:
        cpu: 200m
        memory: 256Mi	
kubectl ile bakınca sonuç şöyleydi. etcd'ler rook-ceph kullanıyordu. vttablet ise standard local Volume kullanıyordu
$ kubectl get pvc
NAME                                                                           STATUS   VOLUME                                     CAPACITY   ACCESS MODES   STORAGECLASS      AGE
adv-vitess-cluster-etcd-07a83994-1                                             Bound    pvc-1e439bae-2835-498b-a397-71be34f5762a   1Gi        RWO            rook-ceph-block   27d
adv-vitess-cluster-etcd-07a83994-2                                             Bound    pvc-fd429045-f9b8-4ec6-9c96-e0ee6b92be32   1Gi        RWO            rook-ceph-block   27d
adv-vitess-cluster-etcd-07a83994-3                                             Bound    pvc-378b1842-9f67-474b-b5fb-176f84ee88e8   1Gi        RWO            rook-ceph-block   27d
adv-vitess-cluster-vttablet-az1-4135592426-c2dc2c3d                            Bound    pvc-3a2010a3-7203-4d2c-81ba-621d80fd12ab   1Gi        RWO            standard          27d

$ kubectl get pv
NAME                                       CAPACITY   ACCESS MODES   RECLAIM POLICY   STATUS   CLAIM								STORAGECLASS      REASON   AGE	
pvc-3a2010a3-7203-4d2c-81ba-621d80fd12ab   1Gi        RWO            Delete           Bound    rlwy03/adv-vitess-cluster-vttablet-az1-4135592426-c2dc2c3d       standard          	   27d
globalLockServers Alanı
Örnek
Şöyle yaparız
apiVersion: planetscale.com/v2
kind: VitessCluster
spec:
  images:
    ...
  backup:
    ...
  globalLockserver:
    etcd:
      affinity:
        podAntiAffinity:
          preferredDuringSchedulingIgnoredDuringExecution:
            - weight: 100
              podAffinityTerm:
                labelSelector:
                  matchExpressions:
                    - key: planetscale.com/component
                      operator: In
                      values:
                        - vttablet
                topologyKey: "kubernetes.io/hostname"
      dataVolumeClaimTemplate:
        accessModes:
          - ReadWriteOnce
        storageClassName: rook-ceph-block
        resources:
          requests:
            storage: 2Gi
      resources:
        limits:
          cpu: 200m
          memory: 128Mi
        requests:
          cpu: 200m
          memory: 128Mi
backup
Okunması gereken iki kaynak var

Eğer storage yoksa şöyle bir hata alırız
$ /vt/bin/vtctlclient --server :15999 ListBackups adv/-
ListBackups Error: rpc error: code = Unknown desc = no registered implementation of BackupStorage
E0903 09:18:47.577379      34 main.go:103] remote error: rpc error: code = Unknown desc = no registered implementation of BackupStorage

Bu alanı kullanınca yeni bir pod yaratılıyor. Şöyle
$ kubectl get pods -n rlwy-08
NAME                                                             READY   STATUS  
adv-vitess-cluster-38e97f2b-vitessbackupstorage-subcontroller    1/1     Running
Açıklaması şöyle
there is a vitessbackupstorage subcontroller pod per backup location, this actually just watches the storage for backups and populates k8s metadata for easy inspection, but afaik it is not critical to proper functioning of the operator

Pod'un içi şöyle. İlginç bir şekilde vitess-operator komutunu çalıştırıyor
$ kubectl describe pod adv-vitess-cluster-38e97f2b-vitessbackupstorage-subcontroller -n rlwy-08
Name:                 adv-vitess-cluster-38e97f2b-vitessbackupstorage-subcontroller
Namespace:            rlwy-08
Priority:             5000
Priority Class Name:  vitess-operator-control-plane
Node:                 rlwy-08-b7pm7-worker-a-rmgg2.c.product-oce-private.internal/172.18.16.126
Start Time:           Sat, 03 Sep 2022 07:28:55 +0000
Labels:               backup.planetscale.com/location=
                      planetscale.com/cluster=adv-vitess-cluster
                      planetscale.com/component=vbs-subcontroller
Annotations:          k8s.v1.cni.cncf.io/network-status:
                        [{
                            "name": "openshift-sdn",
                            "interface": "eth0",
                            "ips": [
                                "10.128.2.39"
                            ],
                            "default": true,
                            "dns": {}
                        }]
                      k8s.v1.cni.cncf.io/networks-status:
                        [{
                            "name": "openshift-sdn",
                            "interface": "eth0",
                            "ips": [
                                "10.128.2.39"
                            ],
                            "default": true,
                            "dns": {}
                        }]
                      openshift.io/scc: restricted
                      planetscale.com/desired-state-hash: d6c24775f5bf18ed4a7a65d19867e444
Status:               Running
IP:                   10.128.2.39
IPs:
  IP:           10.128.2.39
Controlled By:  VitessBackupStorage/adv-vitess-cluster-38e97f2b
Containers:
  vitess-operator:
    Container ID:  cri-o://bce90f255f40f33256fcf08c730dfe1aa86656409ddbe90c9a8bf88e817ab557
    Image:         gcr.io/product-spanner/oce/planetscale/vitess-operator:v2.7.2
    Image ID:      gcr.io/product-spanner/oce/planetscale/vitess-operator@sha256:f5dd9add128c9f4e5a4c1e9ad478b81e2141af1d0ebdbc9bc3c5ac243171f002
    Port:          <none>
    Host Port:     <none>
    Command:
      vitess-operator
    Args:
      --logtostderr
      -v=4
      --default_etcd_image=gcr.io/product-spanner/oce/coreos/etcd:v3.3.13
      --backup_storage_implementation=file
      --file_backup_storage_root=/vt/backups/adv-vitess-cluster
    State:          Running
      Started:      Sat, 03 Sep 2022 07:29:19 +0000
    Ready:          True
    Restart Count:  0
    Limits:
      memory:  128Mi
    Requests:
      cpu:     100m
      memory:  128Mi
    Environment:
      WATCH_NAMESPACE:            rlwy-08
      POD_NAME:                   adv-vitess-cluster-38e97f2b-vitessbackupstorage-subcontroller (v1:metadata.name)
      PS_OPERATOR_POD_NAMESPACE:  rlwy-08 (v1:metadata.namespace)
      PS_OPERATOR_POD_NAME:       adv-vitess-cluster-38e97f2b-vitessbackupstorage-subcontroller (v1:metadata.name)
      OPERATOR_NAME:              vitess-operator
      PS_OPERATOR_FORK_PATH:      vitessbackupstorage-subcontroller
      PS_OPERATOR_VBS_NAMESPACE:  rlwy-08
      PS_OPERATOR_VBS_NAME:       adv-vitess-cluster-38e97f2b
      HOME:                       /home/vitess
    Mounts:
      /var/run/secrets/kubernetes.io/serviceaccount from kube-api-access-k2nlr (ro)
      /vt/backups from vitess-backups (rw)
Conditions:
  Type              Status
  Initialized       True
  Ready             True
  ContainersReady   True
  PodScheduled      True
Volumes:
  kube-api-access-k2nlr:
    Type:                    Projected (a volume that contains injected data from multiple sources)
    TokenExpirationSeconds:  3607
    ConfigMapName:           kube-root-ca.crt
    ConfigMapOptional:       <nil>
    DownwardAPI:             true
    ConfigMapName:           openshift-service-ca.crt
    ConfigMapOptional:       <nil>
  vitess-backups:
    Type:        PersistentVolumeClaim (a reference to a PersistentVolumeClaim in the same namespace)
    ClaimName:   adv-vitess-backup
    ReadOnly:    false
QoS Class:       Burstable
Node-Selectors:  <none>
Tolerations:     node.kubernetes.io/memory-pressure:NoSchedule op=Exists
                 node.kubernetes.io/not-ready:NoExecute op=Exists for 300s
                 node.kubernetes.io/unreachable:NoExecute op=Exists for 300s
Events:
  Type    Reason                  Age   From                     Message
  ----    ------                  ----  ----                     -------
  Normal  Scheduled               10m   default-scheduler        Successfully assigned rlwy-08/adv-vitess-cluster-38e97f2b-vitessbackupstorage-subcontroller to rlwy-08-b7pm7-worker-a-rmgg2.c.product-oce-private.internal
  Normal  SuccessfulAttachVolume  10m   attachdetach-controller  AttachVolume.Attach succeeded for volume "pvc-8fe67bb0-0254-49ca-95d9-4231c1e1fe28"
  Normal  AddedInterface          10m   multus                   Add eth0 [10.128.2.39/23] from openshift-sdn
  Normal  Pulling                 10m   kubelet                  Pulling image "gcr.io/product-spanner/oce/planetscale/vitess-operator:v2.7.2"
  Normal  Pulled                  10m   kubelet                  Successfully pulled image "gcr.io/product-spanner/oce/planetscale/vitess-operator:v2.7.2" in 18.107677153s
  Normal  Created                 10m   kubelet                  Created container vitess-operator
  Normal  Started                 10m   kubelet                  Started container vitess-operator
Bir başkası şöyle. Burada s3 kullanılıyor
$ kubectl describe pod/vt-9f600bb7-vitessbackupstorage-subcontroller
Name: vt-9f600bb7-vitessbackupstorage-subcontroller Namespace: default Priority: 5000 Priority Class Name: vitess-operator-control-plane Node: vmi688654.vpsprovider.net/111.11.11.111 Start Time: Sun, 24 Oct 2021 18:07:41 +0300 Labels: backup.planetscale.com/location= planetscale.com/cluster=vt planetscale.com/component=vbs-subcontroller Annotations: cni.projectcalico.org/podIP: 10.42.0.94/32 cni.projectcalico.org/podIPs: 10.42.0.94/32 kubernetes.io/psp: global-unrestricted-psp planetscale.com/desired-state-hash: 43e34ab9aabc72d1f12a9d40d4fe58be Status: Running IP: 10.42.0.94 IPs: IP: 10.42.0.94 Controlled By: VitessBackupStorage/vt-9f600bb7 Containers: vitess-operator: Container ID: containerd://98c08817cef23757ab33402cddc0efe85840365dddd07421ce282256111c8ccf Image: planetscale/vitess-operator:v2.5.0 Image ID: docker.io/planetscale/vitess-operator@sha256:04a3988f3563b4ff756d410c15fcab92c7a6211dd16313907985c75365f1db7a Port: <none> Host Port: <none> Command: vitess-operator Args: --logtostderr -v=4 --backup_storage_implementation=s3 --s3_backup_aws_endpoint=s3.endpoint.com --s3_backup_aws_region=eu-central-003 --s3_backup_storage_bucket=fake-bucket-name --s3_backup_storage_root=vt State: Running Started: Sun, 24 Oct 2021 18:07:44 +0300 Ready: True Restart Count: 0 Limits: memory: 128Mi Requests: cpu: 100m memory: 128Mi Environment: WATCH_NAMESPACE: default POD_NAME: vt-9f600bb7-vitessbackupstorage-subcontroller (v1:metadata.name) PS_OPERATOR_POD_NAMESPACE: default (v1:metadata.namespace) PS_OPERATOR_POD_NAME: vt-9f600bb7-vitessbackupstorage-subcontroller (v1:metadata.name) OPERATOR_NAME: vitess-operator PS_OPERATOR_FORK_PATH: vitessbackupstorage-subcontroller PS_OPERATOR_VBS_NAMESPACE: default PS_OPERATOR_VBS_NAME: vt-9f600bb7 HOME: /home/vitess AWS_SHARED_CREDENTIALS_FILE: /vt/secrets/s3-backup-auth/backblaze-vitess-backup Mounts: /var/run/secrets/kubernetes.io/serviceaccount from kube-api-access-4k4sf (ro) /vt/secrets/s3-backup-auth from s3-backup-auth-secret (ro) Conditions: Type Status Initialized True Ready True ContainersReady True PodScheduled True Volumes: kube-api-access-4k4sf: Type: Projected (a volume that contains injected data from multiple sources) TokenExpirationSeconds: 3607 ConfigMapName: kube-root-ca.crt ConfigMapOptional: <nil> DownwardAPI: true s3-backup-auth-secret: Type: Secret (a volume populated by a Secret) SecretName: vt-backup-secret Optional: false QoS Class: Burstable Node-Selectors: <none> Tolerations: node.kubernetes.io/not-ready:NoExecute op=Exists for 300s node.kubernetes.io/unreachable:NoExecute op=Exists for 300s Events: <none>
Örnek - hostpath
Şöyle yaparız
backup:
    engine: xtrabackup
    locations:
    - volume:
        hostPath:
          path: /tmp
          type: Directory
Örnek - PersistentVolumeClaim 
Şöyle yaparız
apiVersion: v1
kind: PersistentVolumeClaim metadata: name: adv-vitess-backup labels: app: adv-vitess-backup spec: accessModes: - ReadWriteMany resources: requests: storage: 10Gi storageClassName: rook-cephfs
Daha sonra şöyle yaptım
 backup:
    engine: xtrabackup
    locations:
      - volume:
          persistentVolumeClaim:
            claimName: adv-vitess-backup
Örnek - gcs
Şöyle yaparız
# Version: 20200113
apiVersion: planetscale.com/v2
kind: VitessCluster
metadata:
  name: example
spec:
  backup:
    locations:
      - gcs:
          bucket: mybucketname1
          authSecret:
            name: gcs-secret
            key: gcs_key.json
Örnek - gcs
Şöyle yaparız
spec:
  backup:
    locations:
    - gcs:
        bucket: mybucketname
        authSecret:
          name: gcs-secret
          key: gcs_key.json
vitessDashboard Alanı
Örnek
Şöyle yaparız
apiVersion: planetscale.com/v2
kind: VitessCluster
metadata:
  name: adv-vitess-cluster
spec:
  images:
    ...
  backup:
    ...
  globalLockserver:
    ...
  cells:
    ...
  vitessDashboard:
    cells:
      - az1
    extraFlags:
      security_policy: read-only
      backup_engine_implementation: xtrabackup
      backup_storage_compress: "true"
      backup_storage_implementation: file
      file_backup_storage_root: /vt/backups/az1-vitess-cluster
      xbstream_restore_flags: "--parallel=3"
      xtrabackup_backup_flags: "--parallel=1"
      xtrabackup_stream_mode: xbstream
      xtrabackup_stripes: "8"
      xtrabackup_user: vt_dba
    extraVolumes:
      - name: vitess-backups
        persistentVolumeClaim:
          claimName: adv-vitess-backup
    extraVolumeMounts:
      - mountPath: /vt/backups
        name: vitess-backups
    replicas: 2
    resources:
      limits:
        memory: 128Mi
      requests:
        cpu: 200m
        memory: 128Mi


9 Mayıs 2022 Pazartesi

UPSERT - INSERT ON CONFLICT

Giriş
Açıklaması şöyle
The UPSERT command doesn't exist in MySQL, but upserts can still be achieved. The best method for implementing an upsert in the current version of MySQL is INSERT ... ON DUPLICATE KEY UPDATE . Let's look at that command in a bit more detail.

As the command itself suggests, INSERT ... ON DUPLICATE KEY UPDATE will insert a new row into a table unless it detects a duplicate value in the primary key column, in which case it will update the existing row with the new information.
Söz dizimi şöyle
INSERT INTO my_table (column1, column2)
VALUES
    (value1, value2),
    (value3, value4),
    (value5, value6),
    (value7, value8)
ON DUPLICATE KEY UPDATE
    <column1> = <value1>,
    <column2> = <value2>;
Örnek
Şöyle yaparız. Burada aynı id varsa hiç bir şey yapmaz.
INSERT
IGNORE INTO post_details (
    id,
    created_by,
    created_on
)
VALUES (
    1,
    'Alice',
    {ts '2017-11-06 16:53:34.127'}
)
Örnek
Docker ile çalıştırırız
docker run -d -it  -e MYSQL_ROOT_PASSWORD=root -e MYSQL_DATABASE=db  --name upsertmysql \
 --rm -p 3306:3306 mysql
Şöyle yaparız
CREATE TABLE customer (
  id NUMERIC, 
  name VARCHAR(20), 
  age NUMERIC, 
  address VARCHAR(20), 
  salary NUMERIC,
  PRIMARY KEY (id)
);

INSERT INTO customer (id,name,age,address,salary)
VALUES (1, 'orcun', 47, 'ankara', 2000);

INSERT INTO customer (id,name,age,address,salary) 
VALUES (1, 'colak', 46, 'istanbul', 3000)
ON DUPLICATE KEY UPDATE 
  id = VALUES(id),
  name = VALUES(name),
  address = VALUES(address),
  salary = VALUES(salary)
Örnek
Şöyle yaparız. Burada aynı id varsa günceller
INSERT INTO employees (id, name, email) 
VALUES (2, ‘Dennis’, ‘dennisp@weyland.corp’) ON DUPLICATE KEY UPDATE;
Örnek
Şöyle yaparız. Burada birden fazla satır var, VALUES fonksiyonu kullanılarak belirttiğimiz veriye erişiriz.
INSERT INTO director (id, name)
VALUES
    (4, 'meg'),
    (2, 'robert'),
    (5, 'tamara')
ON DUPLICATE KEY UPDATE
    name = VALUES(name)
Örnek
Şöyle yaparız. Burada birden fazla satır var, VALUES fonksiyonu kullanılarak belirttiğimiz veriye erişiriz. Ayrıca mevcut değere de erişiriz
INSERT INTO t (id, value) VALUES ('A',3),('B',5),('C',7) 
ON DUPLICATE KEY UPDATE value = VALUES(value) + value;


SHOW STATUS

Threads_connected
Kaç tane connection olduğunu görmek için şöyle yaparız
mysql> show status where `variable_name` = 'Threads_connected';
+-------------------+-------+
| Variable_name     | Value |
+-------------------+-------+
| Threads_connected | 4     |
+-------------------+-------+
1 row in set (0.00 sec)

6 Mayıs 2022 Cuma

LIKE

LIKE ve CONCAT
Elimizde şöyle bir SQL olsun. Bu çalışmaz
SELECT id, first_name, last_name, concat(first_name,' ',last_name) AS full_name
FROM mytable 
WHERE full_name LIKE '%scott%'
Açıklaması şöyle. Çünkü MyQL önce where cümlesini çalıştırıyor. Oracle ise önce SELECT sonra WHERE cümlesini çalıştırıyor. Dolayısıyla farklı sonuçlar alabiliriz.
You cannot use a field computed in the SELECT clause in the WHERE clause, because most (if not all) RDBMS evaluate the WHERE clause before the SELECT.
Bunu düzeltmek için sub-select kullanılabilir. Şöyle yaparız
SELECT  *
  FROM  (
        SELECT  id,
                first_name,
                last_name,
                CONCAT(first_name,' ',last_name) AS full_name
          FROM  mytable
        ) a
  WHERE full_name LIKE '%scott%'

Case Sensitive
Örnek
Şöyle yaparız
SELECT * FROM foo WHERE name LIKE 'GSR\\_%' || name LIKE 'GSRSYS\\_%'
Case Insensitive
COLLATE UTF8_GENERAL_CI kullanılır

Örnek
Şöyle yaparız
SELECT * FROM foo WHERE name COLLATE UTF8_GENERAL_CI
  LIKE 'GSR\\_%' || name LIKE 'GSRSYS\\_%'

2 Mayıs 2022 Pazartesi

/etc/mysql/my.cnf Dosyası - MySQL Veri Tabanı Sunucu Ayaları Dosyası

Giriş
Bu dosya mysqld Daemon tarafından kullanılır. 

Bazı Açıklamalar
- Linux ve türevi işletim sistemlerinde bu dosyanın ismi my.cnf.  Dizin olarak /etc/mysql/ veya sadece /etc/ kullanılır. Window işletim siteminde bu dosyanın ismi my.ini
Açıklaması şöyle
The MySQL configuration file is located in the /var/lib/mysql/ directory on Linux and inside of the MySQL version folder on Windows, and it's called either my.cnf or my.ini, respectively. The contents of the file are pretty much the same on both operating systems, though there are slightly more comments on the Windows version of the file.
- Eğer bu dosyayı değiştirmek istemiyorsak MySQL komutu satırı seçenekleri kullanılabilir. 
Örnek
Şöyle yaparız
mysql --host=localhost --user=root --password=mypassword --database=mydatabase \
  --innodb_print_all_deadlocks=0
- Eğer bu dosyayı değiştirmek istemiyorsak ve geçici olarak bir şey denemek istiyorsak SET GLOBAL kullanılabilir
Örnek
Şöyle yaparız
mysql> SET GLOBAL innodb_print_all_deadlocks = 1;
Ayarların açıklaması
Bu dosyadaki ayarların açıklaması şöyle
The file contains every setting that is displayed by the daemon, ranging from settings relevant to the MySQL client itself to SQL modes. All of these options can be also set at runtime by using parameters beginning by "--": we can make MySQL run in an ANSI mode by specifying mysqld --ansi, we can specify the amount of I/O threads available for use by specifying their number (#) in mysqld --innodb-write-io-threads=#, etc.

The configuration works this way because it contains the parameters (sometimes also called variables) which then interact with the daemon, and consequently alter how the daemon (MySQL) functions as a whole.
Diğer Dosyalar
Bu dosya başka konfigürasyon dosyalarını kullanabilir. Mesela "/etc/mysql/mysql.conf.d/mysqld.cnf" Bir açıklama burada

connect_timeout Değişkeni
Şöyle yaparız
connect_timeout=10
binlog_expire_logs_seconds Değişkeni
MySQL Binary Logs yazısına bakabilirsiniz. Burada binlog_expire_logs_seconds ile logların kaç saniye sonra silieneceği belirtiliyor.

Örnek
Şöyle yaparız
[mysqld]
log_bin =                           # turn off
binlog_expire_logs_seconds = 86400  # 1 day
max_binlog_size = 104857600         # 100M
Aynı şeyi şöyle yaparız
mysql> SET GLOBAL binlog_expire_logs_seconds = (60*60*24*3);
Query OK, 0 rows affected (0.00 sec)

mysql> SET PERSIST binlog_expire_logs_seconds = (60*60*24*3);
Query OK, 0 rows affected (0.01 sec)
binlog_format Değişkeni
3 formattan birisi kullanılıyor
1. Statement-Based Logging
2. Row-Based Logging
3. Mixed Logging
Örnek
Şöyle yaparız. binlog_format alanı statement, row ve mixed değerlerini alabilir.
log-bin=mysql-bin
expire_logs_days = 2
binlog_format=mixed # Recommended binary logging format – mixed
innodb_buffer_pool_size Değişkeni
Açıklaması şöyle
Pro tip: If you are setting a PostgreSQL or MySQL, don't use the default database settings because those are meant for personal computers or notebooks.

One example is the Buffer Pool size:

- For MySQL, increase the innodb_buffer_pool_size
- For PostgreSQL, increase shared_buffers and effective_cache_size to match your OS cache size
Ör
innodb_print_all_deadlocks Değişkeni
Açıklaması şöyle
In MySQL, the system automatically detects deadlocks in InnoDB (the default storage engine) and resolves them by rolling back a transaction. The details of the deadlock can be found in the error log if the innodb_print_all_deadlocks configuration is set to ON.
lower_case_table_names Değişkeni
MySQL Linux'ta çalıştığı için tablo isimlerinin büyük küçük harf duyarlı olduğunu gördüm
Bunu değiştirmek için  şöyle yaparız
lower_case_table_names = 1
secure_file_priv Değişkeni
Açıklaması şöyle
One of the most popular parameters is the secure_file_priv variable. This parameter controls where MySQL is allowed to ingest data when the LOAD DATA INFILE statement is being used. The default value for MySQL on Windows is the tmp directory: secure_file_priv="c:/wamp64/tmp".

This variable is important because it puts a restraint on which directories can contain data that is eligible for inclusion in your MySQL database instance. If we load data into MySQL from the wrong directory, we will see a message outlining that we should choose a different folder: ERROR 1290 (HY000): The MySQL server is running with the --secure-file-priv option so it cannot execute this statement.


Soft Delete

Giriş Açıklaması  şöyle When using the soft delete mechanism on the database, you might run into a situation where a record with a unique co...